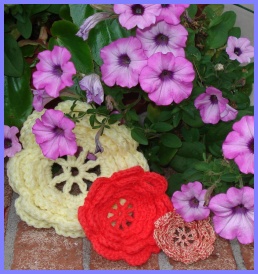
Many crochet doily patterns feature roses. This free crochet rose pattern is inspired by several vintage doily patterns and makes up quick and easy in all of the yarns I tried.
 The yellow crochet rose in the picture was made with typical 4-ply worsted acrylic yarn, the reddish rose was made with a baby weight yarn and the variegated crochet rose was made using two contrasting strands of very thin crochet thread.
Not a single stitch of my crochet rose pattern was changed in making the different sized flowers. But, the thicker the yarn weight, the quicker and easier this crochet flower is to make.
The thinner the yarn weight, the more difficult it will be to see the backs of the stitches to make the foundation rows for the petals.
Crochet Rose Pattern
Round 1 Foundation: Chain 5 and slip stitch into the first stitch to create a ring.
Row 1: Chain 5. Make a single double crochet into the ring. Chain 2 and then make one double crochet repeatedly around the ring until you have a total of 8 posts and gaps. Make a single slip stitch to end the row.
Row 2: Chain 1. Into each of the loops you have created in row 1, make 1 single crochet, 3 double crochet and 1 single crochet.
The smaller and tighter you make the single crochets, the more pronounced the curve of each petal and rounded the edge will be. If you make the single crochets loosey-goosey, it will not look as nice.
Slip stitch to end the row.
Round 3 foundation: You will be creating a series of 4-stitch chains on the back-side of your crochet circle to create a foundation where the next row of petals can be worked. This is created by chaining 4 and then slip stitching onto the back of the post from the previous row.
It is not critical where you decide to make your slip stitch but it is important to be consistent to ensure your flower lays flat and has evenly spaced petals. (I noticed that when the slip stitch is a bit lower on the previous row, the petals stand up a bit more – like the yellow and variegated roses.)
Be fussy about how you attach the last chain 4 in the round. Try to keep it behind the previous row, otherwise the start of the row is noticeable from the front of the rose.
Round 3: Chain 1. In each of the eight foundation loops you made, make 1 single crochet, 4 double crochets and 1 single crochet to create each rose petal.
Do not make a chain in between loops, that’s just to help things lay flat when you start the row.
Slip stitch to end the row. You might want to crochet an extra slip stitch or two to pull the thread below the join and to help disguise the starting and ending point of your rows.
Row 4 Foundation: This foundation is done identically to the row 3 foundation with the singular exception that the chains should be 5 stitches long.
Row 4: Chain 1. In each of the row 4 foundation loops, crochet 1 single crochet, 5 double crochet and 1 single crochet to create each of your rose petals. Slip stitch to end the row and down to where you will be attaching the row 5 foundation.
Row 5 Foundation: Same as previous two foundation rows except make 6 chains for each loop.
Row 5: Chain 1. In each of the foundation loops, crochet 1 single crochet, 6 double crochet and 1 single crochet. Slip stitch to end row and finish your crochet rose.
Hide the tails and cut the ends or use the ends to attach your rose to a larger item.


I often wonder whether or not a particular crochet pattern can be made using different weights of thread/yarn.
Thank you for showing what the flower will look like using different yarns.
That’s something that drives me crazy about some patterns. Unless you have the same exact yarn and needle as the pattern designer, you are unlikely to duplicate their success.
Thanks Nancy for the kind words and I hope you liked your crochet roses.
My long term bf’s mother sent me a picture of one of these exact flowers from a different site where they use them on sewing machines and asked if I could make it for her, and it looked simple enough so I said, “sure no problem!” and then proceeded to find NOTHING, pattern-wise, online (I’m a hobbyist, not good enough to be able to replicate just based on sight)… so, THANK YOU so much from many years in the future for helping me to earn & maintain very crucial brownie points with my “in-laws!!!”
Hi Cat!
What a wonderful surprise to find you comment in my inbox today! So glad you found what you were looking for – brownie points with the in-laws are definitely a good thing! Do you remember what the other site was? Would love to see how someone is making use of my pattern or one similar.