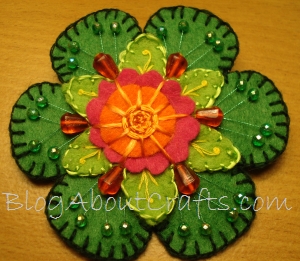
 It’s been some time since I made this felt embroidery. I’ve made several other projects since and thought I would share one of the lessons I’ve learned to make things easier.
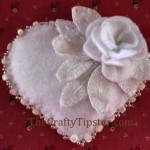
When I made this felt flower, I started by cutting out a matched pair of the green background pieces. I set the back off to the side while I embroidered and adorned the front.
Problem was, when I went to put the two pieces back together, they were no longer the same shape and size. The one I have been working with had mysteriously gotten bigger and out of shape.
Of course, it wasn’t much of a mystery as to what had happened. Part of the reason felt is so much fun to work with is the way it doesn’t fray. But, in exchange for not fraying, felt is easily stretched and can almost disintegrate when the pieces are cut too small.
An embroidery hoop will keep your felt embroidery from stretching out of shape. No, I’m not saying to put the felt in the hoop – one it’s too thick and two it will simply stretch out of shape in new and interesting ways.
Take a piece of scrap fabric and put it snugly in your hoop. You want it to be tight like a drum. Depending upon your fabric choice, you might need to use more than one layer to get the fabric tight enough. I used some sheet-like cotton fabric that’s been lingering in my too big a piece to throw out but not nice enough to use for a project where it’s seen pile. (Aw c’mon admit it, you’ve got a few pieces of fabric like that in your stash somewhere.)
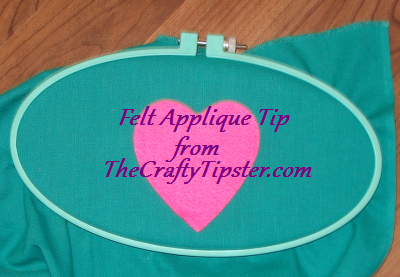 Once the fabric is as tight as it can be in the hoop, I simply laid my felt piece on the fabric and stitched through both the felt and the fabric in the hoop.
The trick to making this work is to not stitch any closer to the edge of the felt than about 1/4 of an inch. That way you can trim the fabric to a size smaller than the felt so that when you sandwich the embroidered piece of felt to the back piece of felt, the fabric won’t show.
Obviously, you would want to use a much smaller hoop than I am showing here if you were going to work with the pink heart I used.
In addition to keeping your felt embroidery from stretching, the second layer of fabric will help prevent your stitches from working through the less densely woven felt. I’ve had several knots work their way through the felt if I’ve tugged too hard when placing a bead. It also makes it easier to run the thread from one side of the felt to the other without the felt puckering. No more knotting and restarting on the other side of a small piece simply because the felt would collapse when the stitch is pulled taught.
I also found it added a bit of strength and heft to the pieces which would hopefully make them more able to stand up to long-term wear and tear or naughty kitties who think your felt pins were made for them to play with.
An added benefit of the extra layers is it helps to get bulky items to lay more flatly on the surface of the felt. In the case of my button project, I was able to get a button with a wired flower to lay flat on my piece simply by removing a bit of the felt and stitching the button directly onto the fabric base.
The pitfall to this method is that if you are making pins or other items for sale, it will add a bit of cost to your project. On the other hand, I have found it tremendously cut the amount of time I spent on the piece and significantly decreased the frustration factor. Besides, you can pick up old sheets and fabrics at thrift stores for super cheap. Just make sure the pattern isn’t so dark that it might show through your felt.

Thank you very much for detailed instructions, I would never have thought to do embroidery that way, I will try it next time. Meanwhile I still have to do the one I have already cut out. It is a felt bird on a twig with 2 leaves. The twig is embroidered, but the leaves are felt, no problem with the felt, but keeping the wax paper in place as I embroider the twig is a bit of a problem. Others say to pin it, but I didn’t leave enough paper to pin, I can’t glue it and I have no spray glue which they say is OK to use. It is only a very tiny bird a bit under an inch long, and it is sitting on the twig.
Anyway, will try your method next time, have only just started doing this kind of thing, before I decorated with sequins and beads. Lately I have started to add embroidery but freestyle, with no lines or anything, and it turns out not too badly. More practice will help I am sure.
Again, thank you,
Elaine Howard
Hi Elaine,
Thank you for stopping by and letting me know you found my little embroidery tutorial useful.
What I do with stubborn pattern pieces or pieces I need to place precisely is find some high contrast thread (a color that looks hideous with the piece and is easily differentiated from the threads you want to keep) and baste the pieces together. Just enough stitches to keep things from moving around and when possible away from any final stitching I will be doing. Once I finish the “real” stitches, I carefully remove the basting stitches.
If you have to, snip some of the stitches rather than sew over them. As you do the “real” stitches, they should start holding everything together for you anyway.
When I’m done, I usually have very little of the basting thread left since I generally pull it out as I go.
Good luck and thank you for visiting The Crafty Tipster and leaving such a great comment.
Michele
Sew it in and embroidery hoop. Duh. Brilliant. Now why didn’t I think of that?
Like the pin too. So pretty.
Terrific work! This is the type of info that should be shared around the internet. Shame on Google for not positioning this post higher!
Thank you for the compliment; my sentiments exactly. Though, I’m not really inclined to accept spam on my site, I thought this way I could beat you at your own game.
What is the pretty stitch you used to piece the back and front together? I want to learn how to make it. Thank you. And that you for the embroidery hoop idea!
You are most welcome to the embroidery hoop tip.
The stitch is super easy; it’s called the blanket stitch. And, I have a tutorial for it too! Just check out my blanket stitch tutorial; it’s a great way to join pieces of felt of other fabrics that don’t fray too much.
Thanks for visiting The Crafty Tipster and it’s always nice to hear someone enjoyed my posts.
Thank you for the bright idea . That is such a great idea, especially for my french knots on larger pieces. Do you have the pattern for the shamrock shown above? I am so glad I found your website..
Oh, Susan, I’m sorry no pattern. You might be able to bring up the photo on a computer and gently trace it from the screen. Or use a graphics program to emphasize the edges.
Thank you for your very helpful tips! I am planning to make embroidered felt Christmas ornaments and I have been wondering what is the best way to do it. Using scrap fabric as backing on a hoop is a wonderful idea! I have read about using fabric as backing for delicate fabrics but I never thought of using it for smaller felt pieces! It makes perfect sense. Plus your suggestion of not stitching any closer than a 1/4″ to the edge of the felt…smart! This will all increase my ability to succeed with my project. :0)
Hi Delia!
Thank you so much for letting me know that you my little post is still helping folks. I love making felt embroidered Christmas ornaments! Our family started making them from kits over 30 years ago (oh dear, it might actually be closer to 40 years ago; sigh). But, now there’s so many wonderful things to be found on the Internet, we really don’t need the kits anymore – though they do make it easier.
If you need to buy the waste fabric, I’ve seen some folks using toile. Haven’t tried it yet myself but it seems like a much cheaper and lighter alternative.
I never hear of toile! I looked it up and it can range from reasonable to expensive, especially the toile with the lovely prints. Toile as I discovered is a French word meaning linen cloth or canvas. I looked at the plain toile and that can be bought for a reasonable price and yes, it does look light.
I really appreciated your post because there really isn’t much information out there (even on YouTube) on embroidering on felt and I think that would be a great topic to show on video. Maybe someday…
Kits are fun by the way and I see all types of kits out there…and it can be easy to get carried away by them. :0) I have a drawer that has accumulated kits and I have to ask myself one day seriously….will I ever complete these? If not, I need to donate them to a local second hand bookstore that has a special room where they offer kits and patterns for sale. All their funds go towards supporting our local public library…a worthy cause!
I do have one other question: do you use the tissue paper method to transfer embroidery over to felt? I heard that transferring an actual print of the design doesn’t work well with felt due to possible smudging, thus the need for tissue paper.
I think felt is one of the greatest materials to play with – it’s relatively easy to find, comes in lots of colors, isn’t too expensive and my personal favorite… it doesn’t fray or require hemming. But, it does seem like it’s seen as a material that is for children’s crafts; particularly the acrylic felt. It doesn’t get the respect it deserves, at least in my humble opinion. You’re right, there’s few tutorials on embroidery with felt. The wool felt seems to be more respectable but for most things, unless you’re going for a heathered look or a specific color; it’s a bit of over kill and a bit spendy. Though, if there’s a rug maker in your life – their felt scraps can really add some beautiful colors and textures that just aren’t available in acrylic.
You can often get toile on rolls. Folks use it to make big bows and cover wreaths. It goes on sale a lot. And check your local fabric shop for mesh and toile by the yard. Sometimes you can get a yard for a dollar or two. And, I admit that I drool over some of the embroidered and sequined toiles too, but alas, they’re often $30 or more a yard.
Oh for sure kits are fun. And, they keep you from having to buy a bunch of felt, beads, sequins, threads, etc in each of the needed colors. They can be a bargain from that perspective. But, once you get going and have a bit of a stash; they aren’t as economical.
On to your question…
If you’re talking about transferring the pattern to cut out small pieces of felt, I use scotch tape. I take a printed version of the pattern and tape each piece/section/area to the felt and cut through the tape and felt following the edge of the design. Just don’t use your best fabric scissor as you will be cutting sticky tape and some paper with it.
I love the versatility of felt, but detailed pattern transfer, can be a problem. Acrylic felt after all, is essentially plastic. Ink just doesn’t dry. A fine point Sharpie kinda works but you’ll often end up with ink all over your fingers and risk ruining the thread. Ball point pen, with multiple passes can work, but again, it’s not color fast. Things made to mark fabric don’t really work either. I’ve had some luck with white out (there’s a pen form) but it’s fussy to work with and more trouble than I think it’s worth – you end up with little white bits of dried white out stuck in your stitches. And, some paint pens can work but then you have to worry about covering the thick lines they create. And, if the paint is thick, it breaks into little pieces too. As a rule, I just wing it when sewing a design on felt.
To be honest, I’m not really a fan of the tissue paper technique. No matter how firmly I’ve stitched and gently I remove the paper; there just seems to always be a bit of noticeable paper left behind which leads to damaged stitches. Some people swear by it, but I rarely, if ever us it. If the pattern’s too complicated to wing it, I might use a modified tissue paper technique… place the tissue over the felt and with a high contrast thread, stitch the outline in a quick basting stitch. Rip away the tissue, gently so as to not disturb the basting and then stitch the actual pattern. That way no paper gets stuck. Just keep in mind, removing your guideline can disturb your embroidery too. If you’re talking about lettering or other fine details, make the outline with the same thread so you don’t have to remove it later.
And, another alternative is to ‘fill’ the area with a piece of felt. You can just use the felt for the color or embroider over it. Keep in mind though, embroidering over it creates a bit of a raised area – which can be good or bad, depending upon the design.
Probably not the definitive answer you were hoping for. A lot of words to say, I don’t have one favorite technique. What I do varies by the complexity of the design.
And, consider this, embroidery is a wonderful art form. The sky’s the limit with what you can do with it. And, if you change your mind (or you are unhappy with it) you can easy remove stitches and do them again – the only loss is the thread and a bit of time. Many other materials are far less forgiving that way.
Take some scrap materials and experiment. Who knows? You might find an even better way to transfer a pattern on to felt and be the one to make that missing Youtube video where I, and others, can shake our heads and say “That’s brilliant! Why the heck didn’t I think of that?”
I think that is a wonderful idea…stitching the outline with the same thread and doing a quick basting stitch as an outline to embroider over! I think that would be my best bet. I do have scraps of felt I can use to test that out. I think testing is a must. There is a whole video (YouTube) on samplers made by Sarah Homfray who encourages people to create samplers as a way to test out a stitch or color of thread, or even to test out a fabric. She shows her personal sampler, which is fabric attached to a hoop and she uses it to test out stitches before jumping onto a project. She gives the word ‘sampler’ a whole new meaning, and I like her definition.
I read somewhere about another felt lover who uses the tissue paper method, using nonwax paper lunch wrap instead of tissue. It is a bit sturdier than tissue paper, but will still tear when ready to do so.
Wow, lots of ideas! Not sure if I will be the one who creates that YouTube video! But I hope someone does it one day!