Many vintage crochet doily patterns make assumptions that crocheters know how many stitches are required to start a row that uses a tall stitch like long double. These assumptions often make the patterns impossible to follow by new crocheters.
The Easy Crochet Doily Pattern, an original free crochet pattern from The Crafty Tipster, includes those extra chains to help the beginner crocheter learn how to start rows of tall stitches. When designing this crochet doily, The Crafty Tipster wanted to keep the counting and fussy stitching to a minimum to make it easier for first-time doily makers and a quickie pattern for more experienced hookers. This pattern is written out to explain where the crochet hook should be inserted into the previous row as well as introduce working from a pattern to newbie crocheters.
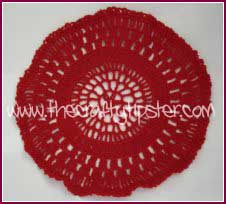
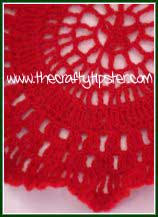
The Easy Crochet Doily pattern is the perfect project for new crocheters and makes up fairly quickly due to the limited counting, yet looks vintage and special. This doily does not lay completely flat, having a gentle rippling around the last 3-4 rows.
I made my doily using red yarn. Who says all doilies have to be white or ecru? A red or green Easy Crochet Doily would make the perfect Christmas gift – don’t you think?
Crochet Stitches Used
Chain(ch) – Twist the yarn over (yo) the crochet hook and pull it through the loop already on the hook.
Single Crochet – Work as follows: insert the crochet through the loops of the previous row, yo and draw the yarn through the loop, there will now be two loops on the needle; yo and draw through both loops on the crochet hook.
Slip Stitch – Insert the crochet hook in the loops, and draw the yarn through this loop and that on the crochet hook.
Long Stitch – Twist the yarn round the crochet hook, insert the hook into the previous row and draw the yarn through. Yarn over the hook and draw it through the first two loops on the needle, then catch the yarn again and draw it through the next two loops; there will be one loop left on the needle.
Double Long Stitch – This resembles long stitch (there will be one additional pair of loops to draw the yarn through), excepting that the yarn is twisted twice round the crochet hook prior to inserting your hook into the previous row.
Half Double Crochet Stitch – Twist the yarn around the hook one time to create two loops on hook, insert the crochet hook into the existing stitches, yarn over and pull through all loops on the hook.
Easy Crochet Doily Pattern & Instructions

1st Round: Using the magic circle make a single crochet into the circle, ch 7, single crochet in the circle, ch 7; repeat around to make 5 loops. (This row is the trickiest of the entire pattern, the rest is easy after this I promise.)
2nd Round: Slip stitch to the peak of the first ch 7 loop. Single crochet into ch 7 loop, 5 ch – repeat around. Close round with slip stitch.
3rd Round: Ch 6 to start the row. 1 double long into 2nd stitch from the join ch 3. Continue working around the row making 1 double long into each 2nd stitch followed by 3 ch. Close round with slip stitch.
4rd Round: Ch 5 to start the row. Stitching in the previous row’s 3 ch gaps and into the posts from the double long crochets, make double long stitches separated by 2 ch around.
Be mindful that when doing the double long crochet into the posts that you don’t slide the crochet hook under only one loop from the previous row as this may create gaps.
Close round with slip stitch.
5th Round: Ch 4 to start the row. Working around the row, make a double long stitches in between each double long crochet and into the posts of the previous row with 1 ch in between each double long stitch. Like with Row 4, make the stitches in the loops and posts of the previous row. Close round with slip stitch into the ch 4.
6th Round: Start the row with a ch of 4 stitches. Working around the row, make two double long crochet in each gap from the previous row followed by 1 ch. Close round with slip stitch into the ch 4.
7th Round: Ch 3 to start the round. Half double crochet around.
When inserting crochet hook go through the ch 1 spaces and gaps in between the double long crochets created in the previous round. Close the round with a slip stitch into the ch 4.
8th Round: Ch 4 to start the round. Make two double long crochet into the gap between two of the half double crochets as close to the ch 4 as possible, ch 1.
Skipping the next two half double crochets from the previous round, make 3 double long crochets into gap between two of the half double crochets of the previous round, ch 1. Continue skipping two, 3 double long, 1 ch around. Close the round with a slip stitch into the ch 4.
9th Round: Slip stitch to the first ch 1 gap from the previous row. Ch 4 to start the round. Make 3 double long crochet in gap and ch 1.
In the next ch 1 gap make 4 double long crochet and 1 ch; continue around. Close making 4 double long crochet followed by 1 ch around the row. End the row with a slip stitch into the ch 4.

10th Round: This round will be worked by stitching in the ch 1 gaps and in between the 2nd and 3rd posts of the 4 double long crochets from the previous row.
Slip stitch to the space between the 2nd and 3rd posts of the previous row’s first set of 4 double long crochets. Ch 3, 1 double long crochet in same space, ch 1. Skip to ch 1 gap and make 2 double long crochets and 1 ch.
Continue working around with sets of 2 double long crochets and 1 ch in the ch 1 gaps and in between the 2nd and 3rd posts of the 4 double long crochets from the previous row. Close the round with a slip stitch into the ch 4.
11th Round: This round will be worked by stitching in the ch 1 gaps and in between the posts of the double long crochet pairs from the previous row.
Slip stitch to the space between the first set of double long crochets from the previous row. Ch 2.
Working around the row, make 2 half double crochets in each 1 ch gap and 1 half double crochet in between each pair of double long crochets. Make the final stitch in the same place you made the ch 2. Close the round with a slip stitch into the ch 2.
12 Round: Ch 4. Slip stitch to the gap between the pair of double long crochet and the single double long crochet, ch 3.
Single crochet into the gap between the next single double long crochet and the next pair of double long crochet, ch 3. Continue working around making 3 ch loops on both sides of the single half double crochets (don’t split the pairs) of the previous round. Slip stitch to join and finish your Easy Crochet Doily!
Crochet Doily Making Advice
It’s very hard to hide mistakes when using crochet thread and making doilies. If is stitch comes out loopy or the yarn splits, pull it out, don’t keep going; it will be noticeable and the time it takes to redo the stitch is negligible compared to creating a permanent oops in your crochet doily.
If you want to make The Easy Crochet Doily look a little different, instead of stitching into the gaps, you could stitch into the loops. The doily pattern does not do this as stitching into the gaps is both easier and quicker.
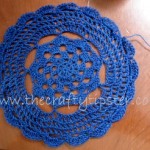
Did I mention that crochet doilies don’t have to be made with only white crochet thread? For my doily, I used a very thin red acrylic yarn. The Easy Crochet Doily could be made using any weight yarn, the only difference being the finished size.


Had been looking for a easy doily patttern,as I’ve been wanting to make one.
Well I have found the pattern&will give this a try.
I actually have never made a doily before,so hope it’s not to hard.
Thank yo for the pattern I have just started and you were right the once you get over the first round the pattern does get easier. Thank you again.
Thanks, Robin for letting me know. I’m glad you can make sense of the pattern. Would love to see your doily when you finish it.
Doilies seem to be making a small comeback recently and I thought I would pass on a tip my mother gave me in the 1950’s when she was teaching me to crochet. Doilies do not have to use the whole pattern unless you want to make the whole thing. You may stop them on any round you would like to and put on a simple shell or picot border to make them finished for your project. I still have some of the ones my mother had me do and they seemed to get larger as I learned how to make the different stitches. My mother also had me make coasters in squares using nothing but single crochet until I learned how to keep an even tension.
Still not written with enough detail for a self taught beginner. I gave up after the 3rd round.
Please accept my apologies. I haven’t looked at this pattern in years. You know what? You’re right. It could be better written. Can’t promise it will be any time soon but it’s definitely back on my to do list. Thank you for letter me know.