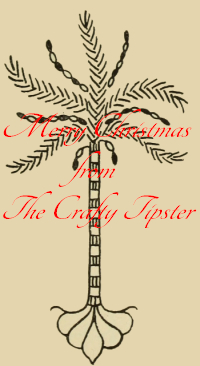
 It started with finding a great vintage embroidery pattern book from 1917, full of all sorts of wonderful patterns to choose from. (Hint, hint, you’ll be seeing more of these patterns as we get them stitched up.) Some are fully worked designs and others are not much more than detailed sketches with a few stitching suggestions.
I printed out several pages of what looked like Christmas trees and asked Mom to take her pick and stitch something for me. It started out like many of our projects do. Within seconds, so it seemed, a needle went flying and we were on our hands and knees with flashlights searching, in vain, for a needle. Then came the scramble to provide the thread colors she wanted. I gave her one of my latest thrift store finds – a bag of odd bits and pieces of embroidery floss that I had picked up for 50 cents. She ran out of some colors, made do with choices she was driven to by a lack of options. But, in the end, I think she did a mighty nice job with this Christmas Palm Tree Embroidery.
The original design reminds me of a South Carolina Palmetto Tree. I suppose anyone looking for a South Carolina Christmas tree embroidery could just add the partial moon and it would be complete.
Christmas Palm Tree Embroidery
Mom opted to use cross stitch fabric rather than felt or another more tightly woven fabric to make use of the holes. As you’ll see, all of her stitches weren’t in the holes but the holes did help her make some straight lines and keep other stitches even in length. I guess you could say she used the weave of the fabric like a ruled grid.
Mom didn’t like the design at the bottom, so she made a little pot instead. She used a combination of French knots and straight stitches to complete her Christmas Palm Tree embroidery.
Mom’s Interpretation of the Embroidery Pattern
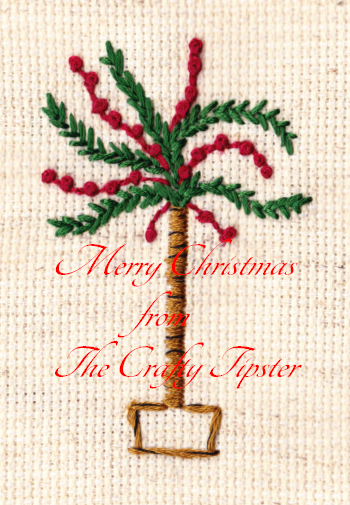 I’ve gone ahead and included a fairly high resolution scan for you since I’m not providing an actual stitch diagram. The idea of the book and our sharing this pattern with you is to encourage you to add your own style to the piece and truly make this your Christmas tree embroidery. (Which is exactly what I suspect the original pattern designer had in mind.)
As you can see, Mom fanned her branches out a little differently than the original.
The green branches were stitched with all six strands of embroidery floss on the 14 count Aida cloth. Each stitch is about two squares long and stitched in a way similar to a herringbone stitch.
The Christmas garland is made with straight stitches the length of a single square (usually in the square but not always) with a French knot sewn every one or two stitches. She used 4 strands of embroidery thread for the Christmas berries. (Yes, I know Palmetto or palm trees don’t have berries but without the berries, this wouldn’t be a Christmas tree embroidery, it would just be a palm tree embroidery…hint, hint)
Mom completely diverged from the original embroidery pattern for the tree trunk. She looked up what Palmetto trees look like in real life and designed her own pattern. Using all six strands of brown embroidery thread, she stitched a trunk that is two stitches wide. For the most part, she followed the weave of the fabric but here and there she stitched slightly into the next stitch to give the trunk a more natural look. She used a single strand of black embroidery thread to make horizontal lines here and there to replicate the look of the real tree as well as to add some visual interest. (The scan shows the black threads much more prominently than they are in real life.)
The pot was also made with six strands of the brown floss but this time the single black thread was stitched with the brown.
I wish I could tell you what colors Mom used. One of the problems with using leftover bits and pieces is the DMC color codes are long gone and forgotten. I can tell you that the green is not that bright Christmas green, it is more of a dark pine color. The red is far closer to a maroon than Christmas red. I’m not even sure where to start in describing the brown color, it seems like it has a lot of beige/greenish tone to it.
Let Us Know What You Think
I’m always excited to see pieces from The Crafty Tipster on Pinterest. But, I would love if you would consider leaving your thoughts here as well. That will help me determine which patterns work better for folks or inspire them more and allow me to try to offer more similar pieces.
