We haven’t tried this vintage pattern yet but have reviewed the pattern and it looks fairly straightforward.
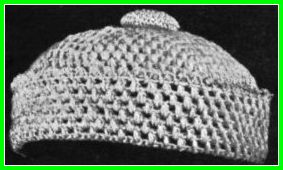 The pattern calls for Shetland Floss. Another site estimates that this is roughly equivalent to light fingerling yarn.
Sorry, you’ll be a bit on your own on this one to determine the appropriate yarn/needle/finished size ratios. But hey, it’s a really cute little crochet hat and the pattern’s free.
Crochet Cap Pattern Using the Bean Stitch
Chain 5, join.
1. Draw up loop one-fourth inch long, yarn over, hook in ring, draw loop through, over and draw through 3 loops now on needle, * chain 1, draw up a loop in ring, over, draw up another loop in ring, over, draw through all 4 loops; repeat to make 4 more bean-stitches, 6 in all, with 1 chain between, and join last 1 chain to top of 1st stitch.
(I know this reads tricky, but it’s not really that bad if you just crochet it and not read too much into it.)
2. Draw loop up long over 1st bean-stitch, over, hook through same stitch, draw through, over and draw through all the loops; this is 1st stitch of each row. Chain 1, a bean-stitch in following space, chain 1, bean-stitch in bean-stitch; repeat around, join.
3. Bean-stitch in 1st stitch, in each space and every 3d bean-stitch, with 1 chain between, join.
4. Same as 3d row, with bean-stitch over every 4th bean-stitch.
5, 6, 7, 8, 9, 10. Same as 4th row, with an additional space between widenings; in 5th row make a bean-stitch in every 5th, and so on, with bean-stitch in every 10th, in 10th row.
11, 12, 13. Bean-stitch in each space.
14. Change to double crochet for head-band, making a double in each stitch.
15, 16, 17, 18, 19. A double in each double, working in both veins of stitch; narrow twice in each row.
20, 21. Double in each double.
22. A bean-stitch in each 2d double, 1 chain between.
23, 24, 25, 26, 27. Bean-stitch in each space; fasten off white yarn.
28. Fasten blue yarn in space, chain 4, draw up a loop in 2d chain from hook, 1 in 3d and 1 in 4th, all rather long loops, over, draw through all 4 loops, chain 1, fasten in next space with a single, and repeat. This makes a small, pointed scallop and finishes edge of cap.
For the crochet button: Using the blue yarn, chain 3, 8 doubles in 2d stitch of chain. Continue around and around without joining, 1st row with 2 doubles in each stitch, then widen sufficiently to keep the work flat until nearly as large as the button you wish to cover; after one or two more rounds, decrease by working off 3 loops instead of 2, slip the button in and continue, keeping the work tight over the button until you have about half of space covered; then break the yarn, draw up with needle and sew to center of crown.
This crochet cap is large enough for a little boy or girl of three years, and may be easily enlarged. The border may be turned down over the ears for extra warmth.


ABSOLUTELY GORGEOUS!
I think it is such a pretty little cap. I’ve been a bit disappointed that no one has let me know if they’ve made one and how it turned out. No babies in the house so it would seem silly to make up one just to see if the pattern is easy to follow and how it turns out.
If anyone does give it a go, please send photos, I’d love to see them.