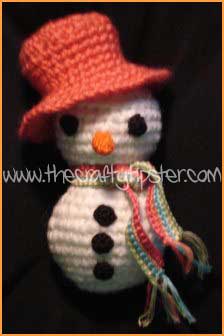
Christmas is always coming! Whether it’s 364 days away or tomorrow, it’s always the perfect time to begin thinking about snowmen.
This pattern makes up quickly and by using different colors of thread and yarn can be made for Christmas at the Beach (as mine is) with a sporty Panama hat or in the more traditional look with a Cossack-style hat and perhaps a red or gray fuzzy scarf.
A note about the crochet hooks I used…
Use a hook one size smaller than is recommended to create a tighter fabric that your stuffing won’t escape or show. For the snowman’s body, I used a size F crochet hook.
For the nose, eyes, buttons, and scarf; I used a 1.25mm crochet hook and all 6 strands of DMC-type embroidery floss.
For the crochet panama hat I used a hook one size smaller than the yarn manufacturer recommends.
To make the Beachy Crochet Snowman you need the following materials:
White 4-ply acrylic yarn. (I had some mystery yarn that I used, probably a bit of Red Heart.Non-white 4-ply acrylic yarn. (I used Caron’s Simply Soft.)Orange DMC or other embroidery floss. (You could also use two strands of a 4-ply acrylic yarn.)Black DMC or other embroidery floss. (Again you could use a thin yarn or 2 strands of a 4-ply.)
Various colors of DMC/embroidery floss or thin yarn of your choice. (Do not use a 4-ply or thick yarn here as the scarf will be too chunky for your snowman.)
Stuffing
Plastic pellets for weight (optional)3 crochet hooks (I used sizes F, G, and 1.25 mm)
Beachy Crochet Snowman Body & Head
(Use white 4-ply acrylic and size F crochet hook)
Row 1: 7sc circle, using Magic Circle Technique.
Row 2: 2 dc in each (14 total stitches)
Row 3: 2 dc in each (28)
Row 4: 1 dc in front loop only (28) – if row curls towards you, slide fingers around to make it curle away from you
Row 5: 1 dc in each (28)
Row 6: 1 dc in each around; increase (2 dc) in 6th, 13th, 18th, 24th and 28th stitches (33)
Row 7: 1 dc in each around; increase in 4th, 15th, and 22nd stitches (36)
Row 8: 1 dc in each (36)
Row 9: 1 dc in each; decrease in between the following pairs of stitches: 1/2, 7/8, 12/13, 20/21, 28/29, and 33/34 (30)
Row 10: 1 dc in each; decrease in between the following pairs of stitches: 4/5, 9/10, 15/16, 21/22, 26/27, and 29/30 (24)
Row 11: 1 dc in each; decrease in between the following pairs of stitches: 6/7, 11/12, 15/16, and 21/22 (20)
Row 12: 1 dc in each; decrease in between the following pairs of stitches: 4/5, 9/10, 14/15, and 18/19 (16)
Row 13: alternate 1dc and decrease around (11)
This is a good time to stuff the bottom circle or your snowman. If you want to weight your crochet snowman down so that he/she will stand on their own, insert some plastic pellets after first lining the bottom with stuffing. The lining will help keep the pellets from working their way out between your stitches.
Row 14: 2 dc in each stitch (22)
Row 15: 1 dc in each; increase (2 dc) in stitches: 4, 8, 12, 16, and 20 (27) [row does not end with an increase]
Row 16: 1 dc in each; increase (2 dc) in stitches: 1, 5, 9, 13, 17, 21, and 25 (34) [row does not end with an increase]
Row 17: 1 dc in each (34)
Row 18: 1 dc in each; decrease in 4 random places, make sure they are not too close together (30)
Row 19: 1 dc in each (30)
Row 20: 1 dc in each (30)
Row 21: [1 dc, 1dc, 1 decrease] around (22) [row does not end in a decrease]
Row 22: Decrease every pair around (11)
At this point I stuff most of my crochet snowman’s head. Don’t fill it so high that you can’t work the last 2 rounds without pulling some of your stuffing through your stitches.
Row 23: 1dc in each (11)
Row 24: decrease every pair around until 6 stitches remain
Cut end leaving a longish tail. Make a slip stitch into the next stitch and pull the tail all the way through to end.
Finish stuffing the head.
I’ve found I can make a much flatter finish it I “sew” the end closed. With the tail on one side, insert the hook from the outside into the stitch directly opposite from the tail. Pull the tail over the edge and through the stitch with your crochet hook. Turn your Beachy Crochet Snowman and insert your hook from the outside in a stitch opposite the tail and pull tail over the edge and through the stitch with your hook. Continue until your opening is closed and no opening is big enough for your stuffing to escape or be seen.
NOSE FOR BEACHY CROCHET SNOWMAN
(Use 6 strands of orange DMC or other embroidery floss and 1.25mm crochet hook)
Row 1: Ch 2, 3 dc in second stitch from hook, do not join (put small piece of contrasting yarn as a row marker)
Row 2: 2 dc in each of the 3 dc of the previous round (6)
Row 3: Alternate 1 dc and 2 dc (increase) in each stitch (9)
Continue working around until you like the length of your nose. Use a slip stitch to end.
You will notice that one side of your carrot nose has a bit of a hole. Insert your crochet hook at the wide end (opening) and through that hole. Pull the beginning thread/tail through the hole and out the opening of your nose and pull snugly but not so tight as to bend your nose. Use the ends of your yarn to gently stuff your nose; trimming the length of the ends as needed to not overstuff.
Use 2 strands of orange floss to sew nose onto your Beachy Crochet Snowman’s face.
EYES & BUTTONS FOR BEACHY CROCHET SNOWMAN
(Use 6 strands of black DMC or other embroidery floss and 1.25mm crochet hook)
Make a circle with 8 stitches. Slip stitch to end and weave tail over and around the outside loops to create a finished edge.
Use 2 strands of black floss to sew eyes and buttons onto your snowman.
CROCHET PANAMA HAT
What makes this hat so much fun to make is that it goes from a floppy nothing to a hat quite suddenly. Stitch count is not as important as making the beginning and end of each row as hidden as possible.
Due to the way this hat is constructed you will need to gently stretch out the stitches near the top edge of the hat and the main column to hide the increases and decreases.
Row 1: Create a 6 stitch circle, slip stitch to join row.
Row 2: 2 dc in each stitch, slip stitch to join row, ch 1
Row 3: 2 dc in each stitch, slip into ch 1 to join row, ch 1
The next two rows will be very noticeable on your hat – be sure not to split threads or miss stitches.
Row 4: Working only in front loop (side facing you) make 2 dc in each stitch, slip stitch into ch 1 to join row – your hat will be ruffly at this point and look decidedly unhat-like.
Row 5: Decrease in every pair of stitches, slip into ch 1 stitch to join,c h 1.
Mark the beginning of the row with a stitch marker or contrasting yarn. Now working in spirals/Amigurumi style, continue crocheting rounds until your crochet top hat is the height you desire. Be sure to stop near where the rows begin.
Gently stretch and shift the stitches to shape your crochet Panama hat.
Panama Hat Brim
Row 1: Return to using the smaller hook or tighter stitches. Ch 1, alternate 2 dc (increase) and 1 dc in each stitch around, working only in front loop; join with a slip stitch into ch 1.
Row 2: 1 dc in each stitch, slip stitch to join, ch 1.
Row 3: [1 dc, 2dc (increase), 1dc] around, slip stitch in ch 1.
Finshing: Leave a tail at least 2 times as long as your crochet top hat is round – trust me better too long than too short, but don’t get silly about it and make your tail 3 feet long. Slip stitch into first stitch of what would have been the next row and pull the tail all the way through. Inserting your hook from the same side each time, pull end through each of the pairs of loops created by the stitches in row eight to create a clean finished edge. (If you need help with finishing, please see our tutorial on Creating a Crochet Finished Edge.)
Alternate Cossack Hat:
To make your crochet snowman with a more Scandanavian or Russian flair, skip making a brim and proceed to the finishing.
SNOWMAN SCARF
You can make a scarf in any number of ways. The crochet scarf I made used all 6 strands of embroidery floss. I made a row of each color and left the ends for the scarf’s fringe. I shifted some of the ends to make them closer together by looping the end through the stitch of the row beside it (it may take more than one try to get it in a good position). When I had the ends fairly close together and laying flat, I trimmed them to the same length and split the 6 strands of each color.
Depending on the yarn you use for your scarf you may require more or less rows. Make your scarf a length that will allow you to tie or otherwise attach it to your Beachy Crochet Snowman.
Your snowman will look better if you make a scarf that uses yarn or threads that are smaller than the yarn you used to make your Beachy Crochet Snowman.


i want to make tis amigurumi pattern but i rarely understand the instruction…coz i usually follow the symbol pattern..can u make it as a pattern using the symbols?? tnx
Hi Dyna,
Sorry for the oh so late response. Most all of the stitches except for the nose are regular crochet. I’m not sure a symbol pattern would make this any easier for you. What I found when I make a new pattern is it is much easier to just dive in and try to make it and decipher the pattern as I go along. With Amigurumi pieces, most of the time a few mistakes here and there won’t really matter much in the end and just make your piece a little more unique.
Michele